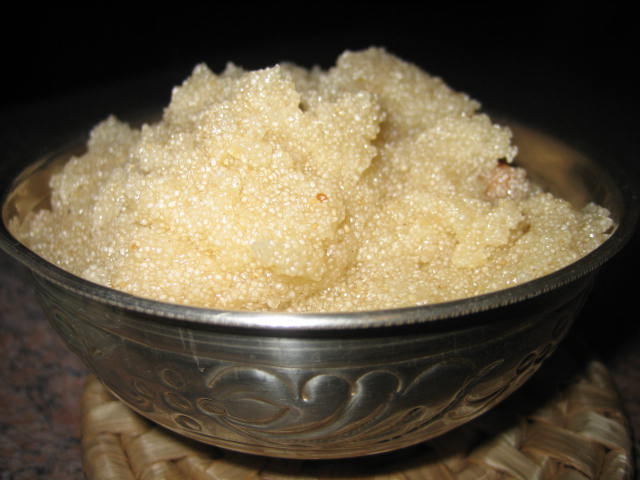
Tuesday, August 22, 2006

Kalakand

As soon as I saw this month's JFI Ingredient was Milk I knew exactly what to make. I thought that being milk based it had to be a dessert and what better than Kalakand.

Well this sweet is probably not really Kalakand but pretty close to it. I have never been a very patient cook and this is probably what has put me off making basundi (one of my favourites!). However this sweet I have been making since I was 10 and I am sure you can get your kids to make (maybe even your husband!).

The thing I really like about this recipe is that if you taste it at each stage during the process it tastes like a different milk sweet. It starts of like khoya then loosely to a basundi flavour, and finally kalakand. So if you like the taste of it somewhere in between just stop cooking.

This dessert is just not an ordinary dessert but was very representive of the immigrant culture. I don't know how it is like in America but when my family migrated to Australia, this was 'THE' sweet to make. It was quick and easy, used a new technology (that was microwave at the time), brought the taste of India and used 'foreign' ingredients. It was a time when using a microwave was pretty new thing to most immigrants let alone cooking in it. This was some 20 years ago. I have seen so many new immigrants taking the latest incarnation of the 'Microwave Sweet' (that was what we referred to it) and looking impressed that they have assimilated to the Aussie lifestyle.

It brings back fond memories as I was the kid who could make a sweet at the age of 10 that was not a cake. Let me know if you have heard of this dessert and I would love to hear your story!

Kalakand

Ingredients
2 cups Full Cream Milk Powder
300 mL Thickened Cream
395 grams Sweetened Condensed Milk
Pistachio Kernels - chopped for decoration. Can use any nuts or omit.

Method
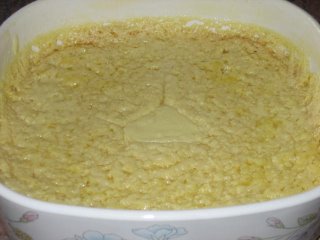
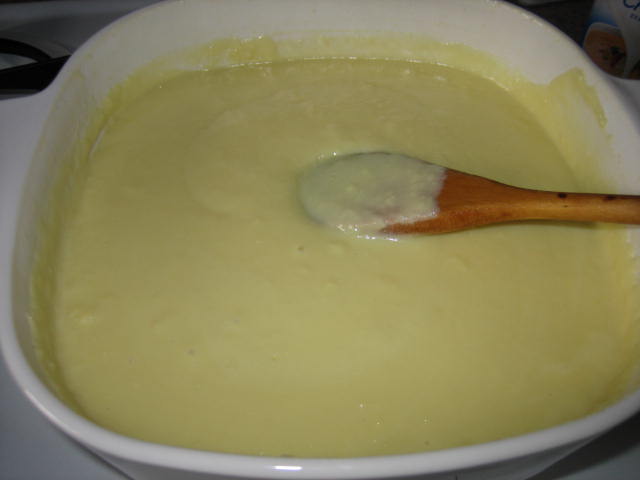
  1. Mix all ingredients together in a microwave safe dish (I use a Corningware dish). Make sure there are no lumps. Taste or lick the spoon. This is stage one. I can't put my finger on what it tastes like but it is good enough to eat now.
  2. On the high setting on the microwave, cook for 6 minutes. Have a careful eye on the microwave as it tends to froth up and spill over. If this happens give a break for 10 or 15 seconds and resume. Also the 'high' setting on the microwaves varies. It is with trial and error that you will get the optimal time taken to get the mix to a stage where the milk solids are starting to come together.
  3. Mix well. Again taste. I think it tastes a bit like basundi at this point of time. Put in the microwave for another 6 minutes. Keep a eye on it for the first few minutes and then it should be okay.
  4. Let it sit the microwave for 5 or 10 minutes after the beep. This gives it some time to fully cook. This still looks a bit raw when you take it straight out but this rest will let it fully cook through.
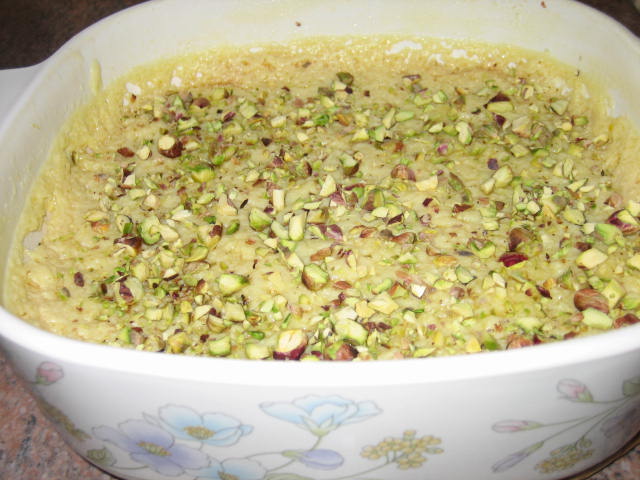
  5. Decorate with chopped nuts. When fully cool you can cut it into pieces and serve. This tastes good warm, cold or at room temperature.
  6. You can cook it a bit longer if you want a more browner, harder texture to it. Really up to you.

So there is my entry using the various forms of milk in about 15 minutes from start to finish. Enjoy!

Okay after thinking about this for awhile I think I am going to enter it in as an 'Improved Indian Dessert' for From My Rasoi (hosted by Katherine at Toast Point). Well I think it fits into the second category where it has been modified to appeal to the western palate. I was going to make Double Ka Meeta or Bread and Butter Pudding (of course in my style!) but I don't think I have time. I guess you just have to wait for that one to show up some time!

Labels:

Sunday, August 20, 2006

Semiya Upma

Living in a foreign country, most people refer to breakfast as being toast, cereal and orange juice. I had a traditional Indian mum and a hard core Andhra husband (I think mentioned this already!). This means that my breakfasts was far from the typical Aussie breakfast. When people ask me what I had for breakfast I struggle to answer. This is because I don't know how to explain what idli, dosas, attukulu, uggani (and the list goes on) even on weekdays. So when I came across Nandita's Breakfast blogging I thought this was good opportunity to explain my typical breakfast.

Due to demanding time constraints on weekday morning, my mum used to try and do breakfast that will only take 20 minutes from start to finish. One of these breakfasts was upma (can loosely to be considered a semolina porridge). And I used to hate it. She was either forced to make an alternative (well really give me the leftovers) or I resorted to 2 minute noodles. Now that I have my own place and I am doing the cooking, we have upma about once a week. And I eat it. But my standard upma stories later.

Semiya upma is a good alternative to me as I like it and it is quick. Semiya is a rice vermicelli that is more like thin spagheti rather than the thin chinese vermicelli. It is quick fix in the morning and good start to the day.

Semiya Upma

Ingredients
2 cups Semiya - you find this in all indian grocery stores
1 medium onion - sliced
1 cup mixed vegetables - I use frozen, you can use fresh but note the time will drastically increase!
2 green chillies - finely chopped
1 tsp mustard seeds
1 tsp cumin
1 tsp pulao masala - MTR brand is good
a few curry leaves
1/4 tsp hing
salt to taste

Method
  1. Toast the semiya until golden brown.
  2. In a little oil, splutter the mustard seeds. Add cumin, curry leaves and hing.
  3. Set the flame to a high - medium. Add the onion and chillies. Fry until onion is golden brown.
  4. Add vegetables and fry until almost tender.
  5. Add masala powder, salt and the semiya.
  6. Mix for a few seconds and boiling water to just cover the whole mix.
  7. Reduce the flame to a medium low.
  8. Cook until semiya is cooked. Will take about 3 to 5 minutes.


I guess this my first submission to Nandita's Breakfast blogging.
Just realised it has been moved to Pavani's Cook's Hideout so I guess it'll be there!

Labels: , ,

Red Capsicum Chutney

After a western dish, I thought I should follow with an indian red capsicum dish. Since I had some red capsicums (I think americans call it red bell pepper) left over I thought I would make a chutney.

When my mother in law came over from India last year we went to Lakshmi aunty's house. There she had red capsicum chutney and has not forgotten since. Everytime I speak to my mother in law she asks if I have got the recipe of Lakshmi aunty. And of course every time I forget. But now I actually remembered and since they were on sale, I bought a few.

However after discovering food blogs I came across Indira's version of the chutney. You know how some recipes you read and you just think that it will turn out excellent. Well this was one of them. Then I was in a state of confusion. Shall I make it Lakshmi aunty's way (which I can't even remember tasting) or Indira's. I thought I would make both. So I started getting all the ingredients for Indira's. However I went to the cupboard and realised that I had 2 peanuts left. Hence I bookmarked Indira's recipe and decided to go with Lakshmi aunty's. However I realised Lakshmi aunty's was simple but really really yummy.

This is a quick chutney that we had with rice, on bread, as a dip and just like that. A truly versatile chutney.


Red Capsicum Chutney

Ingredients
3 red capsicums - deseeded and chopped
2 dried red chillies - torn to bits
2 or 3 fresh green chillies - cut into two
3 or 4 cloves garlic - chopped
1 tsp mustard seeds
1 tsp cumin
a few curry leaves (fresh is best)
1 tsp oil
a small bit of tamarind - soaked in warm water
salt to taste

Method
  1. Fry capsicums until soft.
  2. Heat a little oil and add mustard seeds. Once they splutter, add the cumin and fry a few seconds. Add a couple of curry leaves.
  3. Add garlic and fry until light brown.
  4. Add green and red chillies and fry for a few seconds.
  5. Once all fried ingredients are cool, grind with salt to taste and tamarind pulp.

You can redo the mustard, cumin, curry leaves (and hing) tempering to add but I prefer not to.

Labels: ,

Wheat Noodle Salad

Boy! What a week. As soon as I have started blogging, I have become so busy! Work is busy and home is busy! But I still have managed to cook and more importantly take photos. However it is not until Sunday night that I have managed to find some time to write up all that I have cooked.

If there is one vegetable that me and my husband would regard as our favourite (do people have favourite vegetables?) then it would have to be RED CAPSICUM. I don't know if it is the bright red colour or the sweet yet subtly hot flavour but we love it. It is also a very versatile vegetable. I can make Indian dishes and Western.

The best way to have red capsicum is roasted. And there are heaps of dishes you can make with roasted peppers. I am sure if Indira's JFI has peppers I will have no problems contributing (only prob would be picking which dish is best). Our latest favourite dish at the moment is Wheat Noodle Salad.

There is a Vegan collegue of mine, Albie, that gave me the recipe (he sourced it from somewhere). Him being the vegan and I the vegetarian we usually stick together at work lunches and order the same thing. The first time I had this dish was at his place in an all vegan barbeque. Usually when I go to a BBQ, I usually stick to salad due to fears of cross contamination but both me and Krishna were in heaven when we didn't have to ask 'Is this dish vegetarian?'

I hope that you all enjoy it as much as we have.

Wheat Noodle Salad

Ingredients
3 Red Capsicums
250g Dried Wheat Noodles
350g Snake Beans (any green bean will do. I usually use string beans if I have them or frozen string beans.) - steamed and chopped into bite sized pieces
1 small red onion - sliced
2 tbsp Toasted Seasame Seeds
1/2 cup parsley or coriander - coarsely chopped

Dressing Ingredients
1/4 cup lemon juice
1/3 peanut oil (I usually use a few table spoons rather than this. I guess use as much as it suits you)
1 tsp seasame oil
2 tbsp rice wine vinegar (you can find this in chinese grocery stores)
2 tbsp soy sauce
1 tbsp brown sugar

Method
  1. Roast the capsicums. To do this I just cut deseed the capsicums, quarter them and spray a bit of oil on them and put them in the grill.
  2. Grill until they are black.
  3. Take them out of the grill while they are still hot and put in a plastic bag or in a bowl and cling wrap it. This is to sweat them a bit.
  4. Once they are cool (or well sweated) peel the skin off and cut into strips.
  5. Add all ingredients for the dressing in a jar and shake well.
  6. Meanwhile cook the noodles according the packet.
  7. Gently toss all ingredients with the dressing.

.

Labels: , , ,

Wednesday, August 16, 2006

Krishna Janmashtami Shubakankshalu


Krishna Janmashtami is a festival of Lord Krishna's birthday. Hence I woke up early to celebrate. It is said that along with rangoli, you should draw little feet of krishna coming into the house as to welcome him into your home. I have never been a great rangoli drawer but thanks to the internet I found some good sites (in particular this one) that will help even the artistically challenged (such as myself). So I found this pattern that was small enough that I could do before work (it is Wednesday after all) and still nice enough to entice little ol Krishna. I know that most of you are thinking my god it will make Krishna run in the opposite direction but as I always say 'PRACTICE MAKES PERFECT' so I am going to continue doing rangoli and hopefully Krishna will turn around.


I thought what better way to start my food blogging than doing a recipe of Prasadam. Prasadam is a generic name for all food that is offered to god. However in my home this prasadam is the most popular and is a must when we do any sort of poojas (religious rituals). My mum is famous for hers and mine didn't turn out quite as nice but still not too bad.

Prasadam Recipe

Ingredients
1 cup course semolina (suji)
1 cup sugar
1 cup boiling water
chopped cashews (optional)
sultanas or raisins (optional)
ghee

Method
  1. In a saucepan or wok, add some ghee and fry cashews (if using) on low heat. Once cashews start to change colour add sultanas (also if using). Fry both of them for a few seconds until cashews are golden brown and sultanas have puffed up.
  2. Add the semolina and add some more ghee if you think it is required. Fry until the semolina smells nice (sort of a ghee smell).
  3. Add sugar and boiling water and reduce heat to the lowest setting. Stir until the mix thickens to a dough consistency. This should not take more than 4 minutes.

Once cooled slightly this can be rolled into balls or served in a cup.


Labels: , ,

Tuesday, August 15, 2006

The Blogging World

Wow! It is like I have discovered a whole bunch of friends I never knew I had! After discovering the world of blogging through
Mahanandi's Indira, life will never be the same. Being a relatively newly married bride I was only recently introduced to the world of cooking but this is a totally different dimension. Food Blogging.

When at home I barely knew where the kitchen was but how things have changed! Cooking excited me greatly and althought I always had close access to a rayalseema slash karnataka cooking wiki (well most people refer to it as 'my mum') I craved to try new tastes. Being a south indian, I loved north indian and western. I even converted my hard core andhra husband to try pastas, tacos, laksas etc. After a diverse year of cooking I started craving for authentic Andhra recipes. And long behold I stumbled across Mahanandi which lead me to an entire world of recipes longing for me to make.

The photos on the food blogs reignited my passion for photography. Well actually I was thinking of hiring my husband to do the photos (he is the professional photographer of the family so more time for me to cook) so I think I am only going to start the pilot light in my husband.

My first venture was the Sorakaaya yoghurt curry as I had bought Sorakaya for the first time but wasn't too sure what to do with it. Turned out excellent. Now I cannot rest until I have made everything that I have seen. I shall post my first recipe on the weekend (flat chat at work. Have no time to write the blog with professional photos!) so all of you out there can enjoy my first recipe on a sweet note. I guess no post is complete without a photo, so here are some from my recent trip to the Great Barrier Reef.

Labels: